How to Quickly Insert Date and Timestamp in Excel
A timestamp is something you use when you want to track activities.
For example, you may want to track activities such as when was a particular expense incurred, what time did the sale invoice was created, when was the data entry done in a cell, when was the report last updated, etc.
This Tutorial Covers:
Let’s get started.
Keyboard Shortcut to Insert Date and Timestamp in Excel
If you have to insert the date and timestamp in a few cells in Excel, doing it manually could be faster and more efficient.
Here is the keyboard shortcut to quickly enter the current Date in Excel:
Here is how to use it:
- Select the cell where you want to insert the timestamp.
- Use the keyboard shortcut Control + :
- This would instantly insert the current date in the cell.
A couple of important things to know:
- This shortcut would only insert the current date and not the time.
- It comes in handy when you want to selectively enter the current date.
- It picks the current date from your system’s clock.
- Once you have the date in the cell, you can apply any date format to it. Simply go to the ‘Number Format’ drop-down in the ribbon and select the date format you want.
Note that this is not dynamic, which means that it will not refresh and change the next time you open the workbook. Once inserted, it remains as a static value in the cell.
While this shortcut does not insert the timestamp, you can use the following shortcut to do this:
This would instantly insert the current time in the cell.
So if you want to have both date and timestamp, you can use two different cells, one for date and one for the timestamp.
Using TODAY and NOW Functions to Insert Date and Timestamps in Excel
In the above method using shortcuts, the date and timestamp inserted are static values and don’t update with the change in date and time.
If you want to update the current date and time every time a change is done in the workbook, you need to use Excel functions.
This could be the case when you have a report and you want the printed copy to reflect the last update time.
Insert Current Date Using TODAY Function
To insert the current date, simply enter =TODAY() in the cell where you want it.
Since all the dates and times are stored as numbers in Excel, make sure that the cell is formatted to display the result of the TODAY function in the date format.
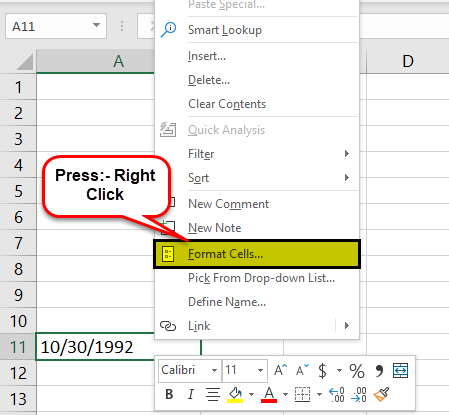
- Right-click on the cell and select ‘Format cells’.

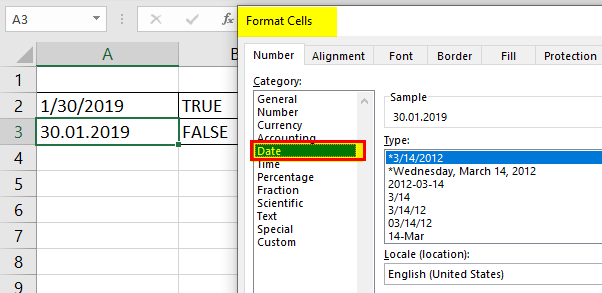
- In the Format Cells dialog box, select Date category in the Number tab.

- Select the required date format (or you can simply go with the default one).
- Click OK.
Note that this formula is volatile and would recalculate every time there is a change in the workbook.
Insert Date and Timestamp Using NOW Function
If you want the date and timestamp together in a cell, you can use the NOW function.
Again, since all the dates and times are stored as numbers in Excel, it is important to make sure that the cell is formatted to have the result of the NOW function displayed in the format that shows the date as well as time.
- Right-click on the cell and select ‘Format cells’.
- In the Format Cells dialog box, select ‘Custom’ category in the Number tab.
- In the Type field, enter dd-mm-yyyy hh:mm:ss
- Click OK.
This would ensure that the result shows the date as well as the time.
Note that this formula is volatile and would recalculate every time there is a change in the workbook.
Circular References Trick to Automatically Insert Date and Timestamp in Excel
One of my readers Jim Meyer reached out to me with the below query.
This can be done using the keyboard shortcuts (as shown above in the tutorial). However, it is not automatic. With shortcuts, you’ll have to manually insert the date and timestamp in Excel.
To automatically insert the timestamp, there is a smart technique using circular references (thanks to Chandoo for this wonderful technique).
Let’s first understand what a circular reference means in Excel.
Suppose you have a value 1 in cell A1 and 2 in cell A2.
Now if you use the formula =A1+A2+A3 in cell A3, it will lead to a circular reference error. You may also see a prompt as shown below:
This happens as you are using the cell reference A3 in the calculation that is happening in A3.
Now, when a circular reference error happens, there is a non-ending loop that starts and would have led to a stalled Excel program. But the smart folks in the Excel development team мейд sure that when a circular reference is found, it is not calculated and the non-ending loop disaster is averted.
However, there is a mechanism where we can force Excel to at least try for a given number of times before giving up.
Now let’s see how we can use this to automatically get a date and timestamp in Excel (as shown below).
Note that as soon as I enter something in cells in column A, a timestamp appears in the adjacent cell in column B. However, if I change a value anywhere else, nothing happens.
Here are the steps to get this done:
- Go to File –> Options.
- In the Excel Options dialog box, select Formulas.
- In the Calculated options, check the Enable iterative calculation option.
- Go to cell B2 and enter the following formula:
Now when you enter anything in column A, a timestamp would automatically appear in column B in the cell adjacent to it.
With the above formula, once the timestamp is inserted, it doesn’t update when you change the contents of the adjacent cell.
If you want the timestamp to update every time the adjacent cell in Column A is updated, use the below formula (use Control + Shift + Enter instead of the Enter key):
This formula uses the CELL function to get the reference of the last edited cell, and if it’s the same as the one to the left of it, it updates the timestamp.
Note: When you enable iterative calculations in the workbook once, it will be active until you turn it off. To turn it off, you need to go to Excel Options and uncheck the ‘Enable iterative calculation’ option.
Using VBA to Automatically Insert Timestamp in Excel
If VBA is your weapon of choice, you’ll find it to be a handy way to insert a timestamp in Excel.
VBA gives you a lot of flexibility in assigning conditions in which you want the timestamp to appear.
Below is a code that will insert a timestamp in column B whenever there is any entry/change in the cells in Column A.
This code uses the IF Then construct to check whether the cell that is being edited is in column A. If this is the case, then it inserts the timestamp in the adjacent cell in column B.
Note that this code would overwrite any existing contents of the cells in column B. If you want. You can modify the code to add a message box to show a prompt in case there is any existing content.
Where to Put this Code?
This code needs to be entered as the worksheet change event so that it gets triggered whenever there is a change.
- Right-click on the worksheet tab and select View Code (or use the keyboard shortcut Alt + F11 and then double click on the sheet name in the project explorer).
- Copy-paste this code into the code window for the sheet.
- Close the VB Editor.
Make sure you save the file with .XLS or .XLSM extension as it contains a macro.
Creating a Custom Function to Insert Timestamp
Creating a custom function is a really smart way of inserting a timestamp in Excel.
It combines the power of VBA with functions, and you can use it like any other worksheet function.
Here is the code that will create a custom “Timestamp” function in Excel:
Where to Put this Code?
This code needs to be placed in a module in the VB Editor. Once you do that, the Timestamp function becomes available in the worksheet (just like any other regular function).
Here are the steps to place this code in a module:
- Press ALT + F11 from your keyboard. It will open the VB Editor.
- In the Project Explorer in VB Editor, right-click on any of the objects and go to Insert –> Module. This will insert a new module.
- Copy-paste the above code in the module code window.
- Close the VB Editor or press ALT + F11 again to go back to the worksheet.
Now you can use the function in the worksheet. It will evaluate the cell to its left and insert the timestamp accordingly.
It also updates the timestamp whenever the entry is updated.
Make sure you save the file with .XLS or .XLSM extension as it contains VB code.
Hope you’ve found this tutorial useful.
Let me know your thoughts in the comments section.
You May Also Like the Following Excel Tutorials and Resources:
Insert Date in Excel
In excel, every valid date will be stored as a form of the number. One important thing to be aware of excel is that we have got a cut-off date, which is “31-Dec-1899”. Every date we insert in excel will be counted from “01-Jan-1900 (including this date)” and will be stored as a number.
Examples
Here we will learn how to insert date in excel with the help of the examples below.
Example #1 – Date Stored as a Number
Take a number of 50, 100 & today’s date, i.e., 30/01/2019 in the excel sheet.
Now, we can observe the way data is stored in excel when we change the formatting of the above data to date & accounting format.
50 – Change format to short date
100 – Change format to short date
30/01/2019 – Change format to accounting as it already in date format
Here if we observe the number 50 has been changed to date and it displayed exactly 50 days from 01/01/1900 (including this date in the count). Similarly, for the number 100, the date displayed is the exact count from 01/01/1900. And the third observation, which is already in date format and we changed to number format, is displaying “43,495,” which says that today’s date, i.e., 30/01/2019 is exactly 43,495 days away from the cut-off date.
Example #2 – Inserting Specific Date in Excel
In the above function, we can observe that DATE is asking to provide values of Year, Month, Day. As we give the details of it then this displays the date in default format as below:
In the above example, we had given the year as 1992, month as 10, and day as 30. But the output is displayed as per the default format.
Example #3 – Changing the Inserted Date Format in Excel
As we have seen in our earlier examples, we have got the date displayed in a pre-defined format. In order to change the format of the date, we should go to format cells. Let’s see how it can be done:
In order to access the format cells, we should Right-click on the date cell, and then the above list of operations will pop out. Here select the format cell which will take to the “Format cells” window.
We got the list of a different format for the date as above. Let’s select one of the formats and see how the format got changed as below.
This is an important feature of formatting, which helps in selecting a date as per their required format for different organizations.
Example #4 – Insert List of Sequential Dates in Excel?
If we want to list out of the sequence of dates, then we can simply do it by selecting the start date and drag it down till you reach the end date as per your requirement.
Insert the date manually (don’t use DATE()).
And drag it down as below.
Here we got the list of dates in a sequence from the starting date.
Example #5 – Insert Dates with NOW() and TODAY() Excel Function
We also got a keyboard shortcut instead of the formulas.
To get the present date, we should use Alt + ; shortcut instead of TODAY()
To get the present date along with time, we should use Alt + Shift + ; shortcut instead of NOW()
Example #6 – How to Extract Selective Information from the Inserted Excel Date Values.
There are three important functions in excel which help us to extract the specific information from the date. They are : –
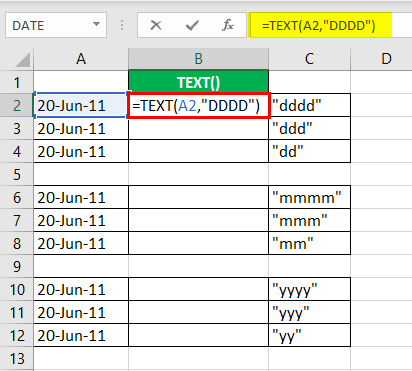
Example #7 – Using TEXT() for Inserting Dates in Excel
TEXT() is one of the very important formulae for a presentation of data into a certain desired custom format.
Let’s assume the dates as per the above example, and we can get the day, month & year, and per the formats that are mentioned in the 3 rd column.
By using the TEXT() as above, we can derive as per the format we required.
TEXT() is also used in changing the format of the date to as per our requirement. By this, we can avoid the steps to go to format cells and then change the format. This will also reduce the time consumption when it comes to changing the format.
Let’s see how we can change the format using the TEXT().
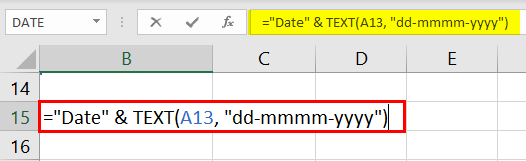
TEXT() will also help us in concatenating with a date. When we try to concatenate without using the TEXT() then it will display the number instead of date as below:
By using TEXT(), we can concatenate with an actual date as below:
How to Change the Format of the Inserted Date in Excel?
If we observe from the above example, the date is in the form of MM/DD/YYYY. Suppose if we want to change the format, then we can do it as per below:
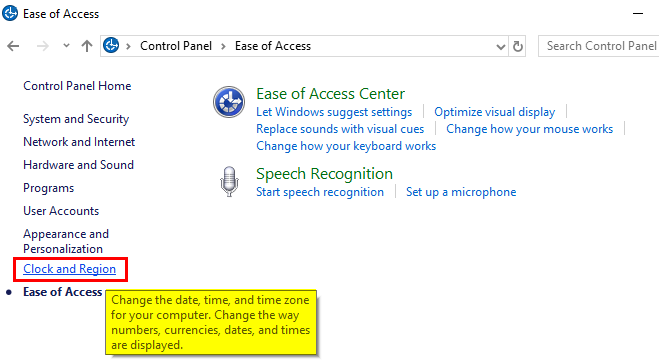
We should go to the control panel then select ease of access. We can visualize the option of clock, language & region.
Click on the above option, and you will pop out to other windows where you get an option of the region and go on that.
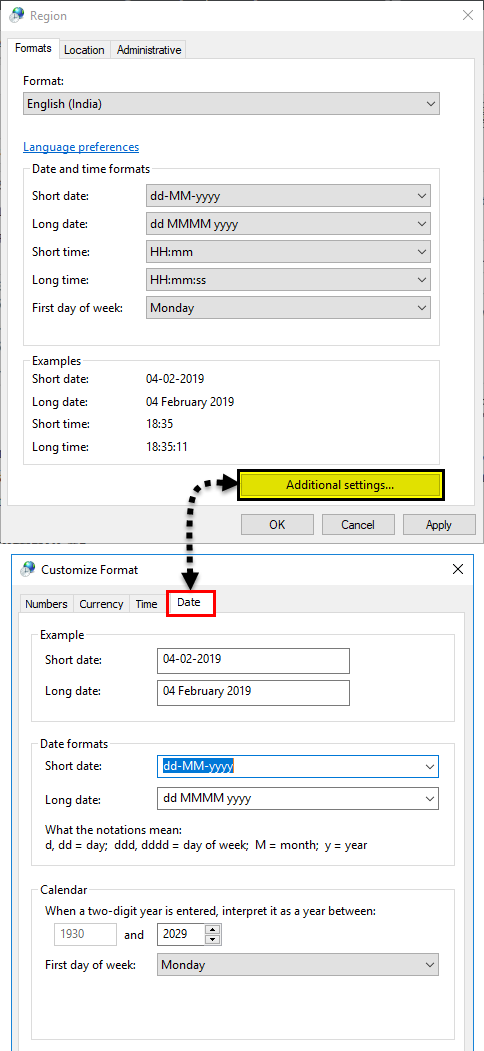
Here we can go on and select the date format as per our requirement, i.e., short date or long date, and this will be the default setting of date once we apply it. In case you want to go back to the previous format, then we can reset it on the same window.
Things to Remember
Let us take the date in two different formats, as shown above. As we know that inserting a valid date in excel should always be stored in the format of the number, so we need to verify the same.
In our example above :
- 30/01/2019 – This is TRUE as it is stored in the form of a number, and this date is valid
- 30.01.2019 – This is FALSE, as it is not stored in the form of the number, and it is not valid.
Recommended Articles
This has been a guide to Insert Date in Excel. Here we discuss how to insert dates in excel along with the top 7 examples using a combination of DATE(), NOW(), TODAY(), and TEXT() Function. You may also look at these useful functions in excel –